Blog

Spinning Peace Symbols

7/25/2016 8:42:50 AM | By Susan Blackwood OPA AIS | Comment on this

Spinning Peace Symbols

I love Montana.  For 24 years, I have painted her beauty on large and small paintings in the studio and on location.  She is a land of varied landscapes in every direction.  None of her cities are so large that you can’t easily and quickly see nature spread out before you. Her resources are wild, untapped and plentiful.


The invitation in 2010, to paint for the “ Montana Landscapes - The Eye of the Beholder Show” at the Holter Museum, in Helena, Montana, gave me the opportunity to paint a landscape that I have had in my heart for several years.  I chose to paint the beautiful and powerful wind of Montana represented by the giant windmills along highway 191.  Standing there, being among the young modern giants that gather the wind, was a thrill beyond measure.  I was enthralled by the choreography of those turning blades as their graceful arms gathered the wind and turned easily.  It became a wind ballet. 


Is this not the ultimate form of peaceful resource? Reflecting upon the horrible oil disasters destroying the environment and wildlife in the when ever there is an oil spill... the lives lost over the oil wars, and our beloved earth choking under the fumes of our homes, cars, and machinery, I realized that our wind is truly the one way to bring more peace in the world. Each state, each country owns it’s own wind.  You can’t go to war to control another country’s wind power.  It won’t “run out”. It is eternally available to all countries.


My hope is that this painting will enlighten the eyes and the heart of each person that gazes upon it.  That gentle breeze is peace.  The roaring blast of air is prosperity. Even the arms capturing the wind are shaped like the international “Peace Symbol” made so popular in the 60’s.


Wind Ballet 22 x 30 Oil by Susan Blackwood

Click here for more about my teaching video


Sign up for Our Blog
Thoughts on the life and world of two Artists


 Follow us on:

Instagram - Susan
Instagram - Howard

Susan's Facebook Page - Like it
Howard's Facebook Page - Like it


Sign up to recieve this newsletter


Susan Blackwood
Web page
E-mail
Howard Friedland
Web page
E-mail

 Jade Street Gallery 


Read More


Lessons Learned

7/18/2016 6:24:20 AM | By Susan Blackwood OPA AIS | Comment on this

Lessons Learned

Tomorrow is my birthday. Funny how they keep showing up, seems like the years are getting shorter at the same time. Another year zoomed by and another year up ahead, full of possibilities.  It is up to me to use these years wisely.  Not only do I want to grow as an artist, I want to grow as a person, giving more of myself to others, taking time to think carefully about my decisions and most of all loving all those in my life.  Our treasures are not in “things,” but in depth. Depth of love, depth of relationships, to my husband, my family and friends, my little critters, my paintings and most of all my God. 


I am so grateful for the years that I have been given on this earth and look forward to many, many wonderful memory building years ahead.  Sure, I have had some bumpy roads throughout my life. Haven't we all? But those ruts and detours have made me strong, taught me to lean into God and given me a song in my heart.  Pain can come in many ways: physically, emotionally, and mentally. All of it is devastating, but it also comes with lessons in love, patience, wisdom and faith.


 At the Window of Life 

Watercolor


Question: Do we get… so we can give? I think so. Down through the years, my experience with the not so wonderful sides of life have helped me pass on lessons to others, much more valuable lessons than those wonderful times of peace and joy in my life. It is those darkest times that I learned to reach out, learned to find my own strength and strength from God.  Often times the strength came by simplifying my life down to the most important aspects of living. 


Shining Through 

Oil 30 x 24


Risky Business

Watercolor


Whoa, heavy thoughts for this glorious morning. One more thought and this is the best one: I can't wait to see how this year will unfold.  What will I be writing about a year from now and what new paintings will I have painted. My challenge… Sure, life is risky, take a chance. Dare to climb to new heights! What lies ahead is always very exciting…. Stay tuned!


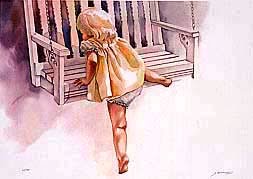
Me at three


Click here for more about my teaching video


Sign up for Our Blog
Thoughts on the life and world of two Artists


 Follow us on:

Instagram - Susan
Instagram - Howard

Susan's Facebook Page - Like it
Howard's Facebook Page - Like it


Sign up to recieve this newsletter


Susan Blackwood
Web page
E-mail
Howard Friedland
Web page
E-mail

 Jade Street Gallery 


Read More


Drawing on Walls

7/12/2016 1:40:00 AM | By Susan Blackwood OPA AIS | 1 Comment

Drawing on Walls

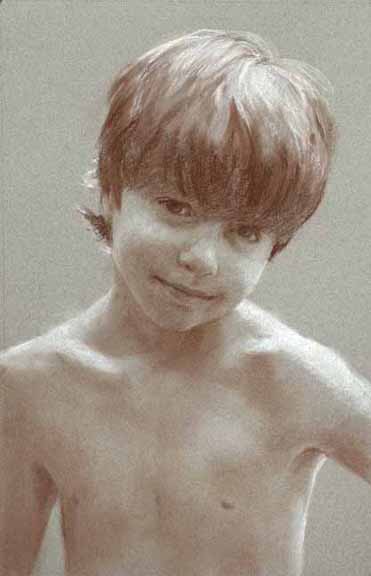
Commission- A boy named Drew
Conte crayon 20 x 13

When I first fell in love with art, my mediums were crayons and pencils. Like many young artists, too young to know the difference between paper and walls, I decorated my parent's home with my little masterpieces. Even then drawing was an obsession. When I was scolded for drawing on the walls, I switched to the walls behind the drapes, or behind the coats in the closet. Lying on my back, I even decorated the underside of the coffee table. Many of my creations weren't discovered for decades! Fortunately my parents were both artists and understood the need to create, so I was supplied with piles of paper, crayons and pencils. When I took it upon myself to help my daddy finish an ink drawing that he had been working on for weeks and I ruined it, of course, he decided it was time for my own art table. It was placed right beside his. Now, many years later, I still crave to draw, but not so much on walls anymore.

Drawing is the backbone of painting, the foundational structure of the composition. Draw well and the painting goes well. Each stoke of paint is placed correctly because of the artist's skill in drawing. If the artist draws poorly, the brush strokes will be shaped poorly. Instead of drawing lines, with a single brush stroke we are drawing with shapes. Those correctly created shapes become mass. This applies equally to abstract as well as realism.


Read More


Making Your Own Linen Panels by Howard Friedland OPA AIS

7/4/2016 8:49:27 AM | By Howard Friedland OPA AIS | 1 Comment

       Commercially made linen or cotton canvas panels are available, and they are very nice.

However, making them yourself will save you money and they really don’t take very long to make.


       Here are the materials that you will need with step by step instructions (and photos) on how to mount linen or cotton canvas to board.


      There are various surfaces to mount linen or cotton canvas to, depending on how light you want them to be. For general use I like Gator Board. Gator Board is similar to Foamcore, however the outer substrate of Gator Board is a harder material and will not bend, Foamcore will bend so it should never be used to mount canvas. Gator Board comes in various widths and in white, natural (tan) or black. If you are traveling and want a thinner panel you can use 1/8th inch Birch plywood, Masonite or Hardwood boards. Another extremely light and thin option is Media Board sometimes called Non Buckle board. It is very thin and you can stack numerous paintings if you are going on an extended painting trip. When you get these panels back to the studio you can then support the Media board with a heavier backing or Foamcore when it’s time to frame the painting.

Note:
 I recommend that you start making small sizes at first 6x8 to 16x20 until you get the technique and drying time down, then you can better handle larger panels 18x24 and larger.


Materials you will need:

A Roll of Pre primed Linen or Cotton Canvas

I prefer linen but you can use cotton canvas if linen is too expensive.

Gator Board (I use 3/16 inch Gator Board for smaller sizes

and ½ inch Gator Board for large panels) 

Masonite or Birch ply wood
Not Foamcore!
To find Gator Board or Media Board/Non Buckle Board try an art supply store or on line. 

For Masonite, Hard Board or Birch Plywood try your local lumber yard.


Miracle Muck Glue
Miracle Muck is water soluble (cleans up easily with water and it is also “heat re-activating”, which means that the low to medium heat of an iron or hair dryer, will allow you to peel up the canvas even after it has dried, if you need to remove the canvas from the board.

IMPORTANT! (be careful that the iron is not too hot or you can scorch your painting).
Get a gallon of it from SourceTek –  www.canvaspanels.com    (they will only ship when the  outside temperature is safely above freezing. If they have a problem sending it, you can try your local art supply stores and see if they can get it.

Small 5 inch wide foam-rubber house painting roller
with reusable (green flocked) rolls
These rolls may be sold separately.
They give you a nice even smooth application of glue which is very important!

Any paint store, or Hardware store should have it.

Large Utility knife
(I use the kind that has segmented blades that I can snap off when they are dull).


Long metal straight edge for cutting

Roll of Masking Tape


Heavy Laminate Roller
The kind that they sell for pressing down Formica to counter surfaces.

Hardware stores carry them.

Paper Towels


The Procedure:

Step 1. 

With a pencil, mark the Gator Board a bit larger than you want the finished panel to be: Example: for an 8x10 inch panel cut it to 9x11 inches


            For small canvases an additional 1/2 inch all the way around is fine.

For larger sizes I recommend 1 inch all the way around. After the canvas is glued down and dried, this makes a nice, clean edge once the excess is trimmed off. However, if you have pre-cut boards to the exact size and don’t have any excess trim, it is not a problem. 


Using the pencil lines for a guide, cut out a piece of Gator Board with the utility knife and metal straight edge. Make several passes of the blade until it cuts all the way through. If you are cutting Masonite or plywood, you may need a table saw to cut the material.

Step 2. 

Cut a piece of Canvas to the same size as the Gator Board in Step #1 and lay them side by side. 

Note:  If you cut the canvas from a roll, you might have to tape down the corners so it doesn’t curl up when you apply the glue.


Step 3.

Pour some Miracle Muck out onto the raw side of the canvas and
work it evenly into the canvas with the foam roller to get a thin and even coat with no puddles or dry spots. IMPORTANT: You want a thin, even coat of glue rolled out from edge to edge.


Step 4.

Pour a small amount of the Miracle Muck from the bottle onto the Gator Board.
Using the foam roller, roll out the glue evenly over the entire surface of the Gator Board. You won’t need to pour out as much glue because the board is not as absorbent as the canvas. (Make sure that there are no puddles or dry areas on the surface).
             IMPORTANT: You want a thin, even coat of glue from edge to edge.


Step 5.

Take the glued Gator Board and flip it over onto the glued canvas surface adhering glue side to glue side. You must do this while the glue is still wet. You will still be able to slide it around or lift up the board to adjust it if necessary.


Line up all the edges as best you can, so when mounted, the weave of the canvas is not crooked. Press lightly over the Gator Board with your hands so that both glued surfaces make good contact.
Then, turn the panel over to the canvas side (removing the tape from the corners of the canvas).
Gently pressing down with your hand again, (this time on the canvas side) starting at the center and moving toward the outer edges, smooth out any air bubbles that might still be between the canvas and board.


Step 6.

Take the heavy roller and bray down the canvas to the board

(roll from the center out to the edges again).


Step 7.

When the mounted canvas is flat and smooth, turn it face down and put some books or other heavy flat object on top to keep the panel flat over night. Be sure to weight the whole surface.
            You can stack several of them under the weights. If you are

           mounting a variety of sizes at a time, put the larger ones on the bottom of the stack.


Step 8.

The next day you can trim off the excess ½ inch of material from the panel with the utility knife. Trim them to the finished size you want. It may take several passes to cut through but you will get a nice clean edge.


Once you do it a few times and get the feel of how much glue to use it should be a breeze to make a bunch at a time with no problem.


Good Luck with your project!

Howard

Be sure to forward these thoughts to your friends!


Click here for more about my video


Sign up for Our Blog
Thoughts on the life and world of two Artists


 Follow us on:

Instagram - Susan
Instagram - Howard

Susan's Facebook Page - Like it
Howard's Facebook Page - Like it


Sign up to recieve this newsletter


Susan Blackwood
Web page
E-mail
Howard Friedland
Web page
E-mail

 Jade Street Gallery


Read More